A Modified L & J. G. Stickley Settle–Design

Stickley Settle

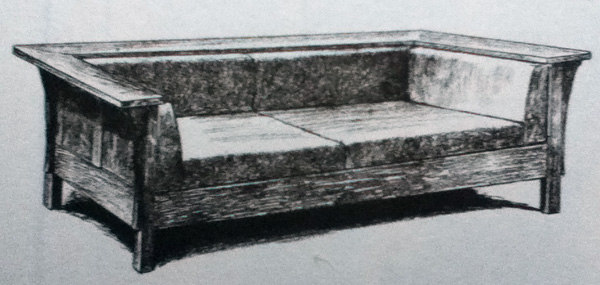
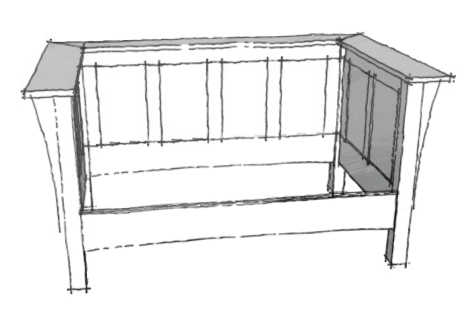
A variation on L & J. G. Stickley’s No. 220. settle. I’ve shortened the length and added a slight arch to the long stretchers.

I’ve admired Leopold and John George Stickley’s “Prairie Style” settle since I first encountered it in Bob Lang’s Shop Drawings for Craftsman Furniture, so my thoughts turned to it when we began to consider replacing some seating in our living room. We needed something shorter, though, so I determined how much space I had, then adapted the Stickley design.  Continue reading

“Building Classic Arts & Crafts Furniture” gets a good review

Hot off the presses--my new book on the Arts and Crafts furniture of Charles Limbert.

Hot off the presses–my new book on the Arts and Crafts furniture of Charles Limbert.

Amidst the distractions of the holidays and the porch build, I neglected to note Chris Schwarz’s favorable review of my book on Limbert furniture at Popularwoodworking.com. He writes:

Author Michael Crow didn’t seek to provide a biography of Limbert’s life. Instead, Crow focused on the construction of 33 of Limbert’s designs. These designs are presented in a manner similar to Bob Lang’s great “Shop Drawings for Craftsman Furniture” books. There is a drawing of the finished piece, plus cutting lists and dimensioned drawings. It is all you need (if you know how to do basic woodworking). Crow wastes no space in telling you how to cut a tenon 33 times.

Read the full review here.

L & J.G. Stickley’s No. 220 Settle

Stickley 220 settle

L & J. G. Stickley’s No. 220 settle from a catalog.

I sometimes wonder whether the Stickley brothers ever gathered as a group in adulthood. I picture them, perhaps sitting down to Thanksgiving dinner, or watching their children open Christmas presents, and imagine the undercurrents and tensions that likely arose when five brothers–Gustav, Leopold, John George, Albert, and Charles–all engaged, in various combinations of partnership, in the same profession with varying degrees of success in New York and Michigan–came together in a single place. Shared meals could have been especially fraught after Gustav’s bankruptcy and short-lived association with Leopold and John George’s company. The latter two brothers built their company on designs in the same style as Gustav’s Craftsman furniture before adapting to changing tastes. While the No. 220 settle shows a Craftsman influence, it is, as Bob Lang observers in Shop Drawings for Craftsman Furniture unlike anything produced by Gustav Stickley. Continue reading

Timber Frame Porch–Complete

new outside light

Installation of an Arts & Crafts-inspired light finishes up the porch project.


12 housed mortise and tenons,
12 bird’s mouth joints, and
66 lap joints
later, I finished up the porch build by installing an Arts & Crafts-inspired light. Follow the links for details on the design and build.

Ridge Cap
Roof
Purlins
Ridge Beam & Rafters
Base
Mortise & Tenon
Design

Continue reading

Timber Frame Porch–Ridge Cap

Cedar ridge cap

Butt-joined cedar 1″ x 10″s form the foundation for the ridge cap. Three layers of cedar shingles top it off.

I’d balked at using the polycarbonate ridge cap also made by the panel manufacturer, a decision I had cause to question as I assembled the ridge cap. I’d decided on a cedar cap, two wide boards joined with a simple butt joint, and originally intended to clad it in copper. A quick look at copper prices sent me looking for other options. It seemed like a good time to use the bundle of cedar shingles I’d purchased for the fence build but didn’t end up using.
I began by ripping a bevel on both boards, and act of geometry that almost defeated my limited mental faculties. To produce the 110-degree angle at the roof peak, I needed to rip a 70-degree bevel along the ridge cap boards. The table saw does not cut at 70-degrees. Stand a board on edge and rip it at 20-degrees, though, and you are left with a 70-degree bevel. After ripping the boards to final width, I drilled some pocket holes and brushed on the glue and screwed the whole thing together. Continue reading

Timber Frame Porch–Roof Panels

michaelOnPorch
The streak of dry weather we’d been enjoying came to an end about the same time I was installing the first panel on the second side of the porch roof. I sank a screw and felt the first drops hit my face, then looked more closely at the first row of panels I’d installed. From my current vantage, the panels looked to meet at a jagged edge along the base of the roof. I’d need to re-do the whole row. My resigned sigh puffed out a cloud of vapor in air just above freezing, and the rain turned from a few tentative drops to a persistent fall. Continue reading

Doormaking and Window-Making for Carpenters & Joiners

… though some so-called up-to-date men may dub them old-fashioned, they are not so by any means, being in constant use at the present time for good work by many who decline to do “jerry” work

I’m taking a short break from timber frames to review Lost Art Press’ new Doormaking and Window-Making for Carpenters & Joiners (available here). The book collects in a single volume two booklets originally written by an experienced joiner and published in England in the early part of the Twentieth Century.  Get past what may seem overly-formal language to a modern ear, and the book contains a wealth of useful information. Doormaking covers the construction and installation of board-and-batten and frame-and-panel doors as well as door frames. Window-Making moves from the simple to complex, detailing the construction of casement and sliding sashes and frames, then bay windows before concluding with Venetian windows. Frequent drawings and occasional photographs illustrate the text. The care with which the originals were scanned and reproduced is evident—the text and images are clear and show minimal artifacting. And all of this comes in a delightful package: the diminutive hardback is embossed with a drawing of the bolection-molded three-panel door (figure 64 from Doormaking), a visual invitation to open the book and learn. Continue reading

Timber Frame Porch–Purlins

purlins

Half-lapped purlins create another layer of visual interest while supporting the roof panels.

The roofing panels I selected required purlins 24 inches on center to prevent sag. Initially, I’d considered installing blocking between the rafters, but after reviewing timber frame images with purlins that ran over the rafters, I drew versions with blocking and overlaid purlins and decided half-lapped purlins looked better than blocking or a simple overlay.

To cut the half laps, I laid out the joints on 2 x 6 stock and used a straight bit in the router guided by a dado jig to notch the stock. After cutting the joints, I ripped the 2 x 6 stock into 2.5 inch strips and rounded over the cut edges with a 1/8″ roundover bit.

After the joinery, installation was easy. The first purlin was set in place at the end of each rafter and screwed into place at every joint. I then used spacer blocks to position the next purlin and fastened it in place. Repeat ten more times, and the porch was ready for a roof.

Timber Frame Porch–Ridge Beam and Rafters

half lap jig

The angled fence guides a top-mounted bearing in a flush cut bit and a stop positions the fence at the correct location for the half lap.

I debated whether to include a ridge beam in the  porch design since it would reiterate the three-beam look of the house’s fascia, and the fact that it would simplify installing rafters finally persuaded me. The joinery was identical to the other beams: an end bevelled on the miter saw and two housed mortises cut with a router and jig. I pinned the half posts into the ridge beam and hauled the whole unwieldy assembly up a ladder and dropped it into place. With the base complete, I was ready to move on to rafters.  Continue reading

Timber Frame Porch–Base Assembly

After pinning the post tenon, the peg is sawn flush to beam.

After pinning the post tenon, the peg is sawn flush to beam.

White oak has a pleasant, nutty scent, a fact of which I was reminded as I sawed the pegs flush to the beams during the last part of base assembly on a surprisingly sunny November day. Assembly began with a final test fit of each tenon into its respective mortise. Once they fit smoothly, I drilled the beams for the pins, and marked the tenons for the offset holes required for drawboring the joint. The offset helps to pull the joint tight and to keep it tight even if wood shrinkage tends to pull it apart.

Continue reading