Monthly Archives: January 2013

Trestle Table–Design

trestleTableSketchI’ve wanted to build a trestle table for some time–the economy of materials and ability to radically alter a design by modifying a few details make it an interesting project–but I didn’t need a new dining table, so I didn’t pursue the project. When some friends moved into a their new house and needed a new table, I jumped at the chance to build a piece.

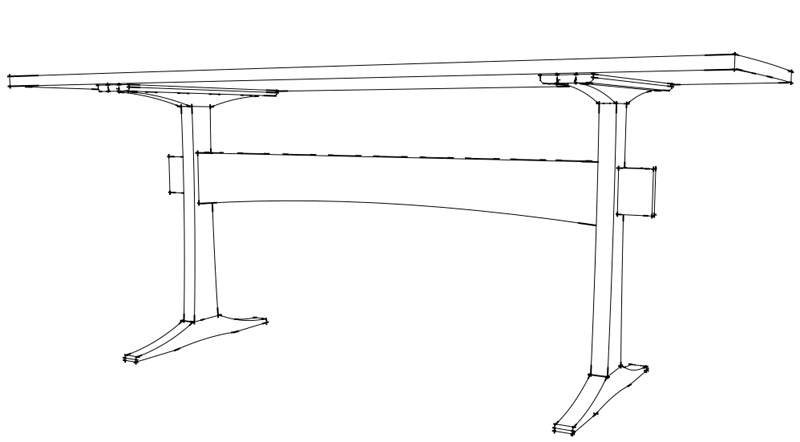
While I had free reign over the design, I wanted to build something that would make them both happy, a slight challenge since his taste tends to Danish modern and hers to traditional. Checking my library showed a surprising amount of variation in design. Changes to the trestle ends, position of the beam, and slight alterations to the top can make the piece medieval, Shaker, or modern. In the end, I opted to modify a design by Gary Rogowski. The updated Arts & Crafts look would strike a balance between tastes. I preserved the slight curves to the top and the keyed through mortise on the beam, then altered the length and width of the design and changed the shape of the trestle slightly, opting for concave curves in the tapered post and feet. Width and length of the top were determined by the boards available for the top. Final dimensions were 29″ h x 29.5″ w x 78″ l.

More Information

  • Gary Rogowski’s original design from Fine Woodworking #214
  • Kenneth Rower has a very useful article on trestle table design in Fine Woodworking #42.

Basic Electrical Kit

A basic electrical kit

Clockwise from upper left: Cable stripper, current tester, wire caps, wire stripper, headlamp, plug tester, adjustable screwdriver.

I don’t have many specific toolkits, and I certainly don’t move in the lofty organizational circles of people posting in the systainer section of the Festool Owner’s Group, but I do have a basic kit for electrical work around the house that lives in its own canvas bag. It’s very convenient to pull the bag out when I have a quick job like switching out lights.

The basic kit includes wire cutters/strippers, a current tester, three-prong outlet tester, wire caps, adjustable screwdriver, and needlenose pliers. For more ambitious work like new circuits or outlets, the kit gets supplemented (metal fish tape, fiberglass fishing rods, a key hole saw, drill bit extensions, etc.), but the basic kit covers a lot of ground and isn’t so expensive that I have money tied up in something that doesn’t get used often.

Vintage Hall Light

An early 20th Century lamp.

An early 20th Century lamp.

We managed a quick getaway to Fed-On Lights in Saugerties, NY while we were upstate over the holidays where we picked up a new light to replace the generically “period” lamp from Lowe’s I’d installed shortly after we moved in. Installation was complicated by an unusually sized base and an adapter bar that didn’t fit the base. A little modification of the bar and some angled screws and I was able to get it in using my basic electrical kit.

More Information

We keep buying lamps and fixtures before I can build some, but some day I’d like to take a crack using the plans in John D. Adams’ How to Make Mission Style Lamps and Shades and Wood Magazine’s Arts and Crafts Furniture as a starting point.

Magazine Stand–Construction

modifiedStickley79

A slightly modified Stickley Number 79.

When the time came to replace the utilitarian shelves in my office, I knew I wanted something in the Arts & Crafts style, but the sloping ceiling and short knee walls create some design constraints, and I needed a design that lent itself to production techniques. After checking my library for options, I decided one variation or another of the magazine stand would match my design and construction requirements.

Initially drawn to the trapezoidal forms produced by the Charles Limbert Company, I prototyped a couple. While they add some visual interest, the tapering sides required cutting three different shelves for each stand, complicating construction. After some experimentation, I settled on a modified version of Stickley’s No. 79. This iteration of the form features rectangular sides softened by radiused corners on the top edge, a half-moon cutout to form the handle, and an arch on the bottom edge. A router template would make reproducing the sides relatively easy, and the straight edges of the sides meant that I could cut the shelves without having to change any tool setups.

Detail of the modified Stickley design.

Detail of the modified Stickley design.

I modified the design to better fit the space and my requirements. I reduced the height from 40
inches to 36, lowered the bottom shelf to increase storage capacity, and increased the radius on the top corners. I also added a couple of inches to the width of the shelves and eliminated the toekick. With the design finalized, I prepared a full-sized router template in 3/4″ plywood.

Since I had a lot of shelves to build, I chose #3 pine. It’s readily available in wide boards and economical. The blanks were cut to slightly oversized on the tablesaw, then attached to the template. Had I been placing all the shelves in the same position for each stand, I could have screwed the template into each side so that the shelves would have hidden those screw holes. But I needed to be able to adjust the height of the shelves, so I used double-sided tape to attach the template to the blanks, then roughed out the shape of sides using the jigsaw and trimmed to final dimensions with a flush-cutting bit in the router.

When I can, I like to pre-finish my projects before assembly. It can increase the time spent on finishing, but it simplifies the process. After sanding through 220 grit, I wiped on three or four coats of amber shellac. Once the shellac was dry, I wet sanded with 400 grit. Joinery is simple: two pocket hole screws in the end of each shelf join the stand together.

A knee wall of magazine stands.

A knee wall of magazine stands.