Category Archives: House

Refinishing the stairs–runner

New runner on refinished stairs.

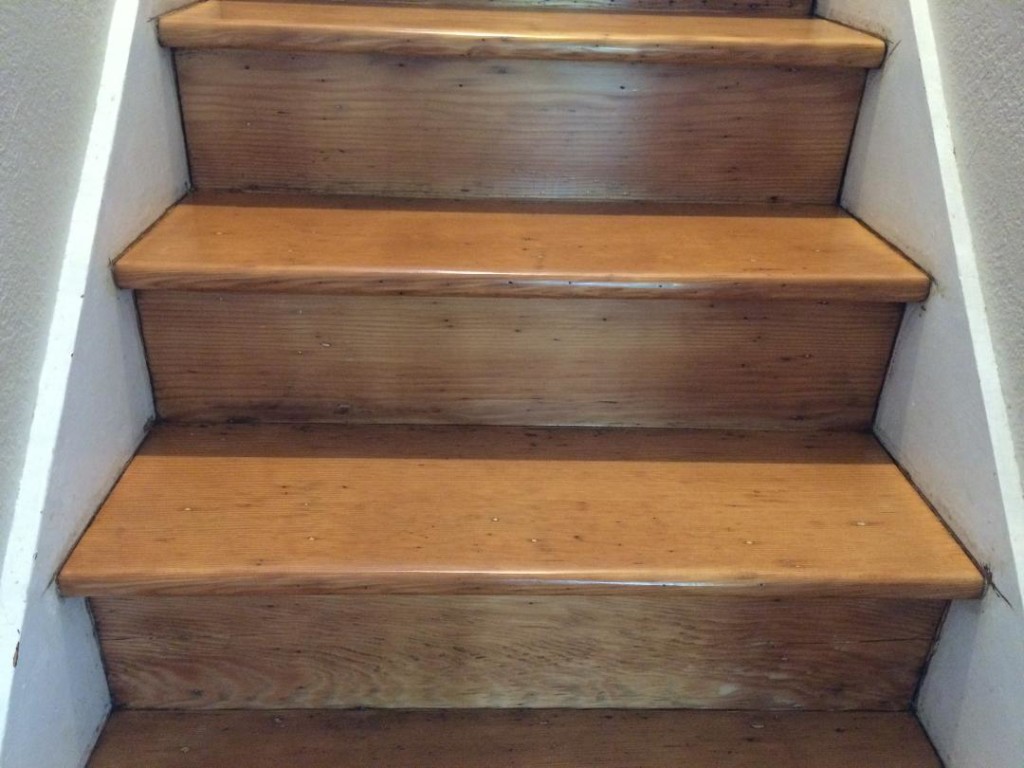
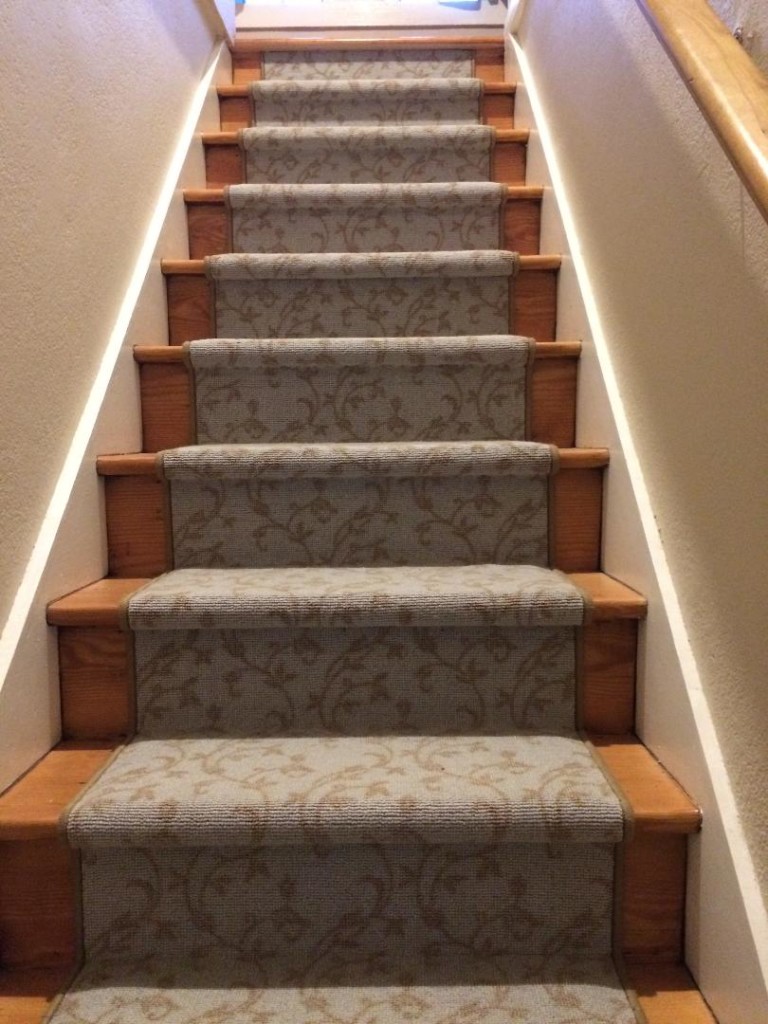
A runner completes the stair project.

It felt a little wrong to install a runner over stairs from which I’d stripped carpet and then refinished, but the stairs were a little slippery under foot. I had no desire to install the runner myself, so we spent an afternoon at a local rug and flooring shop looking for something that would suit both the dining room at the foot of the stairs with its deep green walls and sea-green rug and the upstairs with light tan walls. We settled on a tannish vine pattern over a blue-green base in 100% wool. Picking the pattern was the hard part: a few weeks later the installers spent a difficult three hours installing pad and runner, measuring each step to make sure the runner stayed centered on stairs that were inconsistent in width.

Refinishing the stairs–topcoat

After sanding, I applied three coats of Bona Mega using a lambswool applicator.

After sanding, I applied three coats of Bona Mega using a lambswool applicator.

After the final sanding, I vacuumed and taped the walls, then was ready to apply my topcoat. I chose Bona Mega to match the existing finish and applied the Mega using a 5″ lambswool applicator, following the manufacturer’s directions. It was a surprisingly forgiving process–pour the finish and spread to an even coat with the applicator. So long as the next coat is applied within 48 hours, you don’t need to sand between coats, but I did hand sand with 220 grit before my final coat. Because stairs are high-traffic, I applied four coats over the course of a weekend. While it cured to final hardness, we could consider runner options.

Refinishing the Stairs–Sanding

Sanding the stairwell before refinishing.

Sanding off the old finish was slow work made more bearable with good dust collection.

Welcoming the excuse for a new tool, I picked up Festool’s DTS 400 REQ to reach areas where my Festool ETS 150/3 wouldn’t reach (aside: the DTS 400 REQ worked well for its intended purpose, but I agree with one reviewer who missed the symmetry of the DX 93: You go through more paper not being able to rotate a sheet on the pad). I began sanding at 60 grit and regretted I didn’t have any 40 grit (or even lower) on hand. I used the ETS 150 as much as possible, then switched over to the DTS 400 to reach into the corners of the treads and risers, working through higher grits to 180. After a weekend of sanding, I vacuumed the freshly-stripped wood and wiped it down with a damp cloth. As a probably-not-necessary step (or act of masochism), I then took a quick pass over the stairs with a card scraper. With one last vacuuming, the stairs were ready for a new top coat.

Refinishing the Stairs–Before

Carpeted staircase

Carpeting covered the entire stairwell.

After ten years of indoor and outdoor projects, we were left with one last effort that wouldn’t require removing sections of the roof or overhauling basement drainage: refinishing our upper staircase.

The stairs were covered in the same bad carpeting as the downstairs bedrooms when we moved. Unlike with the bedrooms, where we removed carpet and underlying linoleum to reveal the original fir floors, we left the stairs untouched while we worked on the rest of the house. The carpet wasn’t pretty, but it was inoffensive, protected the stairs, and provided sure footing for pets and toddlers. With the summer in full swing and all my contractual obligations fulfilled, it was time to confront the stairs.

I began by thoroughly vacuuming to minimize spreading dust when pulling up the carpet. Then it was simply a matter of finding an edge and bringing a pair of needle nose pliers to bear. The carpeting came up easily, and for the first time in the history of our pulling up floor coverings in the house, it revealed no ugly surprises–no glued down linoleum, no layers of newsprint, no strips of tacked down salvaged tin strips, not even padding or tack strips.

Instead we found worn but serviceable old growth treads and risers with a failing finish, an ideal candidate for refinishing.

Carpet removed from the staircase

The carpet comes up, revealing no ugly surprises.

Glass Tile Backsplash–Installation

the backsplash ready for grout

The tile installed and ready for grout.

Installation

Having tiled with ceramic tiles, I expected using glass to be very similar. That expectation was met. The reading I did beforehand (This Old House and DIY network were especially useful) suggested special care to avoid scratching the tile’s show surface and to accommodate glass’s translucent characteristic. In practice, I found the glass tile not especially prone to scratching, and the opaque color applied to the back meant my thin set lines didn’t telegraph through the tile, so quickly gave up on knocking them down. The one place I did take special care throughout the project was when cutting tiles–they seemed more prone to chip out than ceramic tiles, so when making cuts, I would cut in from one edge slightly then flip the piece over and finish the cut.

Layout is perhaps the most important aspect of a tiling project, and the kitchen set up made that task easy for this project. I worked in from each exposed edge toward either a corner or bank of cabinets and was able to run 7 full courses of tiles up the wall. The irregular vertical positioning of outlets made for some awkward cuts, but we were still able to install the entire backsplash, grout, and caulk over four days.

Tools and Materials

Glass Tile Backsplash–Before

The kitchen before a new glass tile backsplash.

The renovated kitchen in my sister-in-law’s kitchen included a wall paper treatment featuring marbled burgundy and floral border. Image via Zillow.

Over the holidays, my wife and I installed a glass tile backsplash in my sister-in-law’s new house, replacing the wallpaper installed by a previous owner as part of the kitchen renovation. Although labor intensive, it’s not too technically challenging a project. It helped that they’d stripped the wallpaper and scuff sanded the sheetrock beneath to provide tooth for the thin-set we used to adhere the tile.

The backsplash prepped for tile

Once the wallpaper was stripped and the sheetrock scuff sanded, the backsplash was ready for tiling.

Milling a Windowsill

A window sill

The bottom of the original sill. The tightly-spaced growth rings are a sight to behold.

My neighbor presented me with an interesting challenge: mill a new windowsill for a garage window. He was replacing the old window and needed to replace the rotted sill. The original featured beveled edges to account for the angle of the sill and two grooves its bottom. The shallow groove provides a drip edge to keep water from running under the sill. The deeper groove accommodates the edge of the siding.

Milling the new sill was straightforward. Using the original sill as a reference, I set the table saw blade to the bevel angle and ripped the bevel. The complimentary angle on the opposite side was achieved by flipping the board and running it down the other side of the blade. After planing my saw cuts to produce a finished edge, I used a router to plow both grooves, taking multiple passes with a 1/4″ straight bit to produce the correct width and depth for the grooves.

The new sill, featuring much wider growth rings.

The new sill, featuring much wider growth rings.

Mid-Century Production Design

Mid-Century living room

The Masters home from Masters Of Sex (Photo: Michael Wylie)

The AV Club recently featured an article on what it’s like to be a production designer. The interview subject, Michael Wylie, designed the sets for Masters of Sex. There’s not much on Mid-Century, but it was interesting to read about how Wylie used production design to help establish the personalities of Ben Masters and Virginia Johnson. In Johnsons’ case, the austere Mid-Century decor reflects a repressed personality.

Shaker Peg Board

shaker peg board.

A three-inch strip of lightly-chamfered and painted poplar serves as the base of the peg board.

I’ve wanted some method for storing yard implements for some time, but I wanted something with more appeal than the utilitarian plastic and metal options available. I finally decided that Shaker peg board would make a nice alternative. I ordered some maple pegs online, but only afterward did it occur to me that even my best free-hand drilling attempts were likely to leave the pegs at least slightly off-center and a bit splayed. So I deferred and other projects intervened until I had access to a drill press and was ready to build. Consulting Thomas Moser’s How to Build Shaker Furniture and John Shea’s Making Authentic Shaker Furniture, I decided on a three-inch wide board with the pegs set 6″ on center.

Actual construction went quickly. After ripping some poplar to width, I planed away the machine marks on the show side of the board, ran a chamfer around its perimeter and hit it with a quick pass of 220 grit sandpaper before priming and painting. I then marked the location of the pegs using dividers and a square, then drilled them out with a 1/2″ Forstner bit. I had contemplated different fastening techniques, ranging from a French cleat, to plugged screw holes, when it occurred to me that  each peg was an effective plug. So I drilled pilot holes in every few peg holes, positioned the board on the wall, and marked the concrete wall. Even with a hammer drill, it took some time to drill holes for masonry anchors. With the anchors finally set, I screwed the board to the wall and tapped the pegs into place with a wooden mallet.

Original Exterior Finish Revealed

stained shingle

Flaking paint revealed the original finish coat for exterior shingles–it looks to be a green stain.

I took advantage of some unseasonably warm (and dry) weather to touch up some exterior paint. As part of my prep, I scraped patches of loose paint, revealing what looks to be the original finish–a green stain. So it looks like the clapboard was painted green and the shingles stained. Not an unusual approach for the period.