An Arts & Crafts TV Stand–Construction

Arts and Crafts TV stand

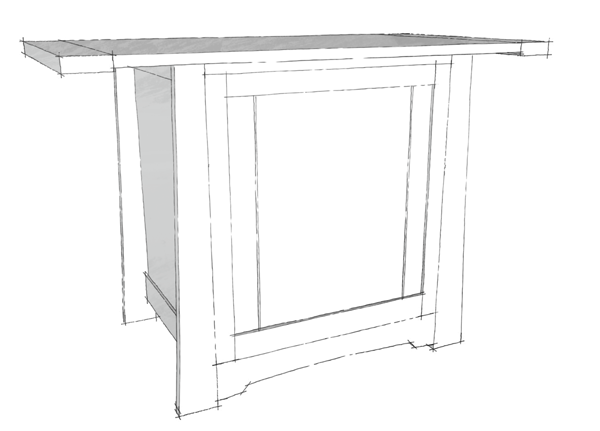
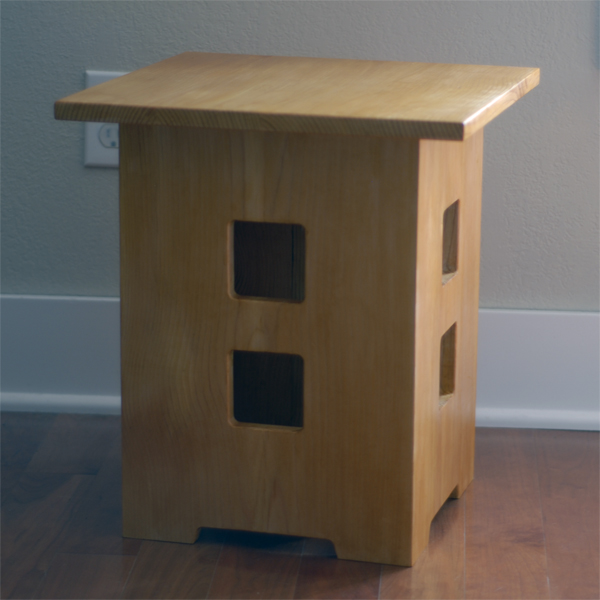
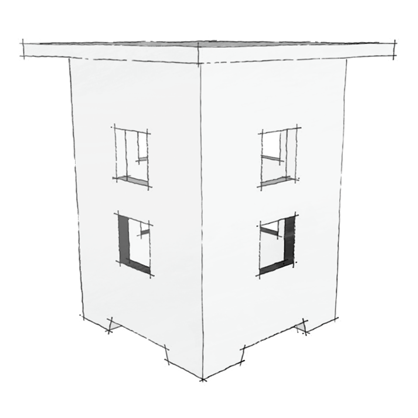
The reverse tapered legs, overhanging top, and stepped arch on the bottom rail place this TV stand in the West Coast Arts and Crafts style.

The stand is essentially a case bookended by two face frames, with the frames’ stiles extending below the bottom rail to form legs. I began by cutting the side top and bottom rails to size and using a slot cutter to rout a 1/2″ deep x 1/4″ wide groove in one edge of each rail. I then cut side panels from some 1/2″-inch plywood and routed a rabbet along the short edges of the panel. I like to pre-finish my projects when I can, and I took that approach here. After sanding through 250 grit, I wiped a coat of boiled linseed oil onto the side components and followed with a couple of coats of blonde shellac, then wet sand to 400 grit.  With the finish in place, I glued the tongues on the plywood panels to rabbets on the rails. To finish the box, I cut the bottom and top panels from 1/2″ plywood, finished them, then attached them to the side using loose tenons.

Continue reading

Blue, Yellow, Brown: A Little Touch Up Painting

Stripping paint.

Scraping and sanding reveals previous coats of paint and the milling marks on cedar siding.

I spent much of the holiday weekend scraping, sanding, and painting the clapboards on the south side of the  house and had plenty of time to contemplate life’s profundities, questions like “At what point does “shuffle” become indistinguishable from “repeat” on even a long playlist?” and “Who spackles square feet of exterior surfaces?” Most on my mind, though, was this: is there any home improvement task less rewarding than freshening paint? Do the crews painting the Golden Gate feel satisfaction when they finish a coat, or just despair when they have to begin again immediately? Certainly there are worse jobs–anything involving waste lines, for example. But done well, the prep, priming, and painting produce an effect almost indistinguishable from the point where you began. There’s no peeling or fading, but there isn’t the drama of a new color. Continue reading

An Arts & Crafts TV stand — design

TV stand

Sketch for a tv stand.

If design is about solving problems, then the problem I was attempting to solve with this design for a minimal tv stand was that of grasping hands. The knobs and buttons of my home theater components were proving irresistible to my toddler son, and I wanted to replace my existing stand–a wide, Shaker-ish piece with open shelves–with something smaller and enclosed. Continue reading

Stickley at the Met

A keyed through tenon anchors stretchers to legs in this library table by Gustav Stickley

A keyed through tenon anchors stretchers to legs in this library table by Gustav Stickley

Gustav Stickley is perhaps the most famous name in the American Arts & Crafts movement. Certainly he was its greatest proponent, extolling the virtues and benefits of the movement in the pages of The Craftsman. The clean lines, visual mass, and joinery as ornament Stickley championed are evident in the pieces featured in the Metropolitan Museum’s collection. On display in gallery 743 are a small sideboard, tall clock, and leather-covered library table, and the museum’s viewable storage features a Harvey Ellis-designed music case. Continue reading

A detail of the Blacker table showing brackets and wood drawer pull.

A detail of the Blacker table showing brackets and wood drawer pull.

The holdings of the Metropolitan Museum’s Gallery 743 read like a greatest hits list of American Arts & Crafts makers, featuring pieces by Gustav Stickley, Dick Van Erp, William Lightfoot Pierce, Arthur Frank Mathews, Charles Rohlfs, and the Byrdcliffe Colony.

Included in the collection are a library table, dining chair, and lantern Charles and Henry Greene designed as part of a commission for the retired lumberman Robert Blacker. As with much of the furniture designed by the Greenes, these pieces were built in the shop of Peter Hall.   Emil Lange, formerly of Tiffany Studios, made the lantern’s glass panels. Continue reading

Limbert No. 234 Side Table–Construction

Limbert's No. 234 side table reproduced in pine.

Limbert’s No. 234 side table reproduced in pine.

I’ve admired the No. 234’s design for some time, but at 18 inches, it seems a little short for a side table. Before committing to white oak or cherry for my final project, I rehearsed the build in pine. Since the wide board I picked up had some nice quarter-sawn figure along both edges, I took some time cutting around knots and glued up the top and base. While my panels dried, I prepared the template, laying out the pattern on a piece of plywood and building a quick frame sized for the square cutouts. Using a template for the cutouts on the template requires substantially less time than drilling out the corners of each cutout, sawing close the line and sanding and filing to final shape. Continue reading

Limbert No. 234 Side Table–Design

Sketch of the Limbert 234 Side Table

The 234 is distinguished by its small size and square cutouts.

The No. 234 features the square cutouts found in many of Limbert’s designs (see also the No. 367 bookcase). Here they echo, in negative form, the square top. The 16-inch top is centered on a 12-inch columnar base. At 18 inches high, it is shorter than the usual height of side tables, but two together make an interesting alternative to a coffee table. A tapered notch forms two feet on on each side.

Kitchen–Dishwasher Install

dishwasherDetailAfter three years and approximately 10,000 dishes washed by hand, we finally decided to install a dishwasher. We’d always planned on it–had, in fact, left a bank of drawers empty in anticipation of replacing them–but it was a low priority. The space available wasn’t quite large enough for a 24″ model, limiting our search to 18″ models. As it turns out, the pool of candidates was limited to one cheap model, one mid-range model, and two ridiculously expensive models. A cost-benefit analysis showed spending the money for the mid-range Bosch was worth it for a stainless steel tub, hidden controls, and quiet operation. Continue reading

Kitchen floor

The kitchen floor before refinishing

The white vinyl floor didn’t look terrible, but it was vinyl. So it had to go.

We successfully ignored the vinyl floor in our kitchen for two years. It wasn’t offensive (although the white did tend to show dirt quickly). It even matched the tile backsplash. But floor in the living room appeared to run interrupted underneath the vinyl, suggesting the fir continued into the kitchen. While my wife was out of town for a week, I pried up the transition strips, slid a putty knife under the vinyl and tore up a strip while hoping the fir didn’t end butted up against a sheet of plywood or had rotted.  Continue reading