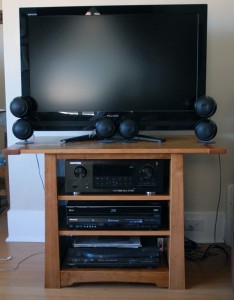
The reverse tapered legs, overhanging top, and stepped arch on the bottom rail place this TV stand in the West Coast Arts and Crafts style.
The stand is essentially a case bookended by two face frames, with the frames’ stiles extending below the bottom rail to form legs. I began by cutting the side top and bottom rails to size and using a slot cutter to rout a 1/2″ deep x 1/4″ wide groove in one edge of each rail. I then cut side panels from some 1/2″-inch plywood and routed a rabbet along the short edges of the panel. I like to pre-finish my projects when I can, and I took that approach here. After sanding through 250 grit, I wiped a coat of boiled linseed oil onto the side components and followed with a couple of coats of blonde shellac, then wet sand to 400 grit. With the finish in place, I glued the tongues on the plywood panels to rabbets on the rails. To finish the box, I cut the bottom and top panels from 1/2″ plywood, finished them, then attached them to the side using loose tenons.
With the box in place, it was time to move on to the face frames. Since I was dealing with multiple identical parts–the stiles and bottom rails–I prepared templates for pattern routing, first cutting close to my layout lines, then sanding for final fit. Once the templates were complete, I used them to layout my parts and cut out the blanks (saving the cut-offs from the stiles for cauls later simplified glue up). Using double-sided tape, I attached the templates to the blanks, then routed them to final size with a flush cut bit in the router. After rounding over all exposed edges of the frame components, I sanded and finished them, then joined them using loose tenons.
After gluing the face frames to the case, I cut three shelves from 1/2″ plywood. Thin trim strips were glued to the front and back edges of the top and middle shelves, but the last shelf forms a pullout tray to house the record player. The lower front rail forms a handle for the tray, and it rides on wooden guides. The shelves rest on pins, allowing storage to be re-configured as I switch components in and out.
3/4″ plywood forms the bulk of the top. This panel received trims strip on the front and back edges. Breadboard ends here cover the plywood edges instead of keeping a glue-up top from bowing. The ends are a common Greene & Greene detail, but, unlike the Greene brothers, I opted to make the top edges of the top and breadboard ends flush to maximize usable space on the top. Since the plywood move with changes in humidity, I used loose tenons to attach the ends. After finishing the top, I attached it using screws through the case top.
The original design called for for a leaded-glass door to prevent prying toddler fingers. However, the lag time between design and construction meant my son had outgrown the worst of his grasping tendencies. So I didn’t include the door in the build. I actually prefer the open case since it allows easier access to the components and better airflow.


Pingback: Evolution of a TV stand | 1910 Craftsman