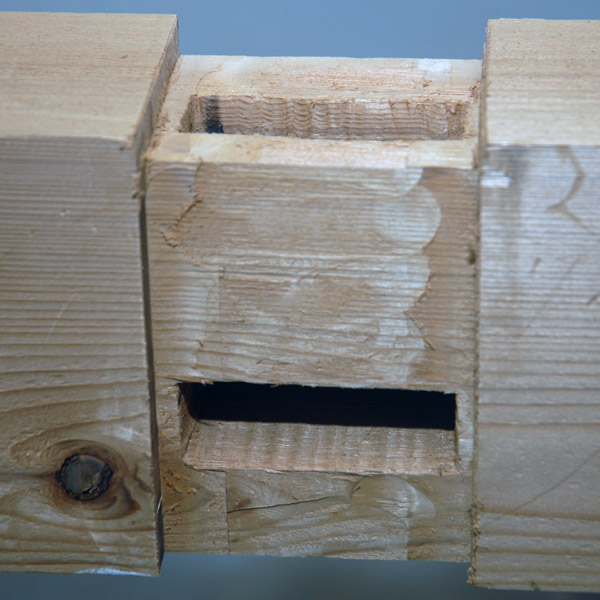
The tree nail, or trunnel, is a wooden peg used to pin the tenons of a timber frame to their mortises. Commercially available pegs are turned on a lathe, but traditionally they are shaped from rived wood, often using a draw knife to round the wood while it’s secured in a shaving horse. Riving, or splitting peg blanks instead of sawing them, ensures the grain of the wood runs continuously through their entire length and minimizes the risk of the peg splitting when it is hammered home. Since timber frame joints are usually drawbored–the hole in the tenon is offset slightly from the hole in the mortise walls–the continuous grain of a rived peg is especially desirable. Continue reading
Cutting tenons for a Timber Frame

After defining the tenon shoulders with a handsaw, I cut the cheeks on the bandsaw, then tuned with rasp and chisel to fit.
A survey of resource suggested the following considerations for sizing the tenons used in timber frame construction:
- The thickness of the tenon is usually one-quarter the width of the timber but no more than one-third.
- The tenon usually runs the whole width of the member being tenoned.
- The walls of the mortise should be at least the thickness of the tenon.
Since I was working with 4 x 4 and 4 x 6 stock, I made my tenons an inch thick and two inches deep. And since I think a little shoulder is a good thing, I reduced the width of the tenon by a half inch to leave a quarter-inch shoulder on the sides of the tenons. Continue reading
Timber Frame Mortise

These two housed mortise were cut with a router using jigs and template bushing to guide the router.
I had admired the timber frame construction I saw on display in the temples of Kyoto and Himeji castle, so the decision to use those techniques when building the new porch was an easy one. Too, I figured, timber framing shouldn’t be too different from furniture making–simply scale up the joinery. A little reading (the timber framing section of the Forestry Forum and the Fine Homebuilding archive) suggested the theory was might be sound, but the practice of scaling required a whole different set of techniques and tools. Continue reading
The Once and Future Patio
While the old porch was serviceable, it had been built for functionality, not form. The roofline was sloped to shed water, but the one-way slope contrasted harshly with the roofline of the garage. Nor did the algae covered fiberglass panels and peeling paint contribute to the effect. Still it kept the table dry and provided a convenient place for ammonia fuming, so we tolerated it. Since the patio was being replaced, it seemed reasonable to replace the porch as well. Continue reading
A Craftsman-Appropriate Patio–Construction
Construction began with some destruction. I’d agreed to knock down the porch before the crew from Father Nature Landscapes, so the week before they were do in, I put on my safety glasses and ear protection and took a sledgehammer to the porch. It surprised me how easily it came down. After cutting its remains into station-wagon sized chunks, I hauled the porch to the dump. Continue reading
A Craftsman-appropriate patio–design
Having (finally) decided to replace our decrepit patio, we defined our requirements–appropriate for our Craftsman bungalow, follow roughly the same footprint, and a new covered porch–we iterated through variations on the same basic idea until we settled on a final plan. We preserved the same basic footprint, slightly expanding the side bed and pulling out a small paved section next to the house to create a new bed. Continue reading
Limbert No. 346 Magazine Stand–Variations
I recently finished a simplified version of Limbert’s No. 346 Magazine stand (read more here) and have been thinking about variations on the design. This take is itself a variation, simplified to take advantage of dimensional stock and pocket-hole construction, but there’s more opportunity for increasing the stand’s utility.
It’s an attractive design, but the trapezoidal shape means you lose some storage at the ends of the shelves and the shelves become shallower towards the top. These limitations are the main reason I opted for a rectilinear design when building shelves for my office. Too, the short vertical spacing between the last few shelves means you won’t be putting any tall books on them. As it is though, it makes an attractive display stand or a fine shelf if you don’t own many books. If I were to build it again, I think I’d use the original depth to keep the extra width on the upper shelves. I’d also think about eliminating one of the shelves to allow for more spacing between them, a decision that entails altering the position of the cutouts in the sides. Continue reading
Patio–Before
We’ve been thinking about a new patio for years. The original featured multiple coats of peeling paint over cracked concrete. Topping the patio was a functional if ugly covered porch. Working on other projects, we continued to give the patio some thought, especially when nice weather pulled us outside. But it stayed low on the list. Until this summer.
Patio Bolt
God or the devil may or may not be in the details, but there is definite satisfaction. We recently had our old patio replaced. As our first major project we hired out, it was a little odd to not be doing it ourselves. I did, though, manage to leave a little work for myself. Part of the patio plan includes a new covered porch, which required new footings for a couple of posts. The crew from Father Nature Landscapes dug the holes and placed a couple of Sonotubes, then bricked around them. The rest was up to me. Continue reading
Mackintosh at the Met
Like the dry sink, the washstand has been supplanted by indoor plumbing–who needs a washstand when they have a private bath?–but I can’t help but think about repurposing this design to fit contemporary needs. Rodel reimagined it as a serving table, but it would also work as a sink base with little modification, either with the plumbing exposed below the open counter, or with cabinets enclosing the base.