Tag Archives: table

A Rustic Dining Table

rustic table

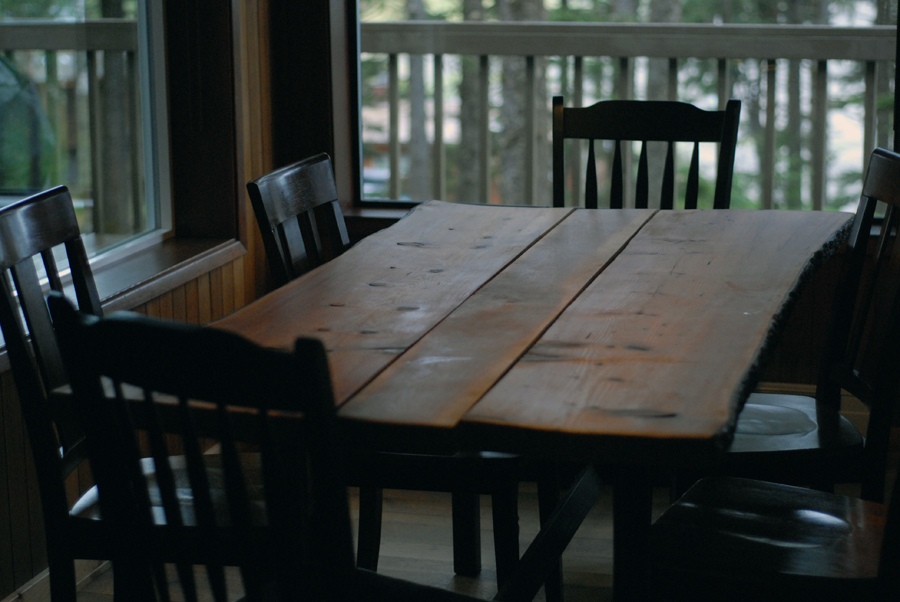
A slab plank table with welded base.

We recently spent a couple of days on the Washington coast. The cabin had been recently renovated in what I’d call “Pacific Northwest Rustic.” Imagine lots of fir slabs used as benches and shelves, and featured prominently in this dining table. The top consists of a couple of small slabs and a fill strip, all attached to the welded steel base through the bottom so fasteners won’t show. If the top was ever level, it isn’t now–there’s a noticeable amount of cup to the slabs, but I can’t tell if that’s because the boards were inadequately dried before construction or because only the top was finished. It’s a suitable design for the space and location and was probably reasonably economic to produce–both key factors to consider when furnishing 28 cabins. Were I to build something similar, though, I think I’d opt for a trestle base in wood. And the top is the perfect place for some butterfly keys.

Limbert No. 234 Side Table–Construction

Limbert's No. 234 side table reproduced in pine.

Limbert’s No. 234 side table reproduced in pine.

I’ve admired the No. 234’s design for some time, but at 18 inches, it seems a little short for a side table. Before committing to white oak or cherry for my final project, I rehearsed the build in pine. Since the wide board I picked up had some nice quarter-sawn figure along both edges, I took some time cutting around knots and glued up the top and base. While my panels dried, I prepared the template, laying out the pattern on a piece of plywood and building a quick frame sized for the square cutouts. Using a template for the cutouts on the template requires substantially less time than drilling out the corners of each cutout, sawing close the line and sanding and filing to final shape. Continue reading

Limbert No. 238 Tabouret


Limbert's No. 238 tabourette reproduced in cherry.

Limbert’s No. 238 tabourette reproduced in cherry.

The original version of this side table sold for $7.00 in Limbert’s 1905 catalog. Like other of Limbert’s best pieces, its design transcends the period, making it a bit of chameleon at home with many styles. The original was built of quartersawn white oak with a fumed finish. I chose to build it in cherry following an article from the November 2003 issue of Popular Woodworking.

The project provides a fine introduction to pattern routing since each leg is identical. The article calls for arranging the rabbeted legs in a pinwheel pattern, which makes for an awkward glue up since the parts want to slip when clamped. If I were building another (easy enough to do with the pattern prepared), I might rabbet both sides of each leg to produce a centered tongue, then assemble in stages, beginning with gluing two opposing legs together and finishing by gluing the remaining legs in the grooves formed by the meeting of the opposed tongues.

I began by selecting the best wood (“best” a relative term for the mediocre stock I had on hand) for the top, gluing it up. I then marked out the legs, cut out rough blanks, and used a bearing bit in the router guided by the pattern to cut the legs to final shape. I sanded through 400 grit, taped off the joints, and applied a couple of coats of boiled linseed oil. After glue up, the top was attached using brackets.

More Information

Model in the Sketchup Warehouse

Popular Woodworking’s Arts & Crafts Furniture (Amazon link) collects some of the magazine’s most popular Arts & Crafts projects, including this tabouret.

A narrow table–construction

The table: before. Red alder in the rough.

The table: before. Red alder in the rough.

I don’t like dimensioning rough stock, but my local sawyer had a good price on red alder. So construction began with a lot of time on the jointer and planer. Once I’d prepped my stock, I chose the best boards for the tops and glued them up.

While the tops dried, I prepared the template for the long aprons, then cut the blanks. The pattern was roughed on the bandsaw, then each apron was routed to final shape using the template to guide the router.  While the original design called for a stepped arch on the short aprons as well as the long, they made the table look too busy, so I went with straight aprons for the sides.

After cutting the tops to final size, I added a two-inch bevel along the bottom edges. The long bevels were cut on the table saw. Since the top was far to long to bevel the short edges on the table saw. I used scrub and smoothing planes to bevel the shorts ends.

One of two completed tables prior to installation.

One of two completed tables prior to installation.

The legs began as 8/4 stock roughed out to 1.5″ blanks. Before cutting the tapers, I pre-drilled for hanger bolts. Another template simplified reproducing the curved taper 16 times with the router.

After sanding all parts through 220 grit, I wiped on three coats of blond shellac, then lightly wetsanded with 400 grit to smooth things out once the shellac had cured.

Then it was time for assembly. I attached the aprons to the to the top through pocket screw holes after reaming out the holes to allow the top to expand freely. To allow the tables to knock down for transportation, the legs were attached using hanger bolts and corner blocks.

asianTableFront

A narrow table–design

AsianTableI eyed the metal and “wood” desk with some trepidation from my vantage point on the inflatable mattress. My sister’s guest room was small enough that you couldn’t sit in the chair at the desk with the bed inflated. Had the outward curving metal legs run straight down instead, it might have worked. Clearly a piece designed for the space would make things more usable. Since her birthday was coming up, I offered to build her something. I took some measurements, and sent her some photos to consider.

The space was about eight feet wide and 18 inches deep, which suggested a parson’s table, but I needed to be able to transport the finished piece. In the end I decided two tables would be more practical and more flexible. After some consideration and taking an online furniture quiz, my sister reported she liked “Asian style” furniture. So the design brief called for two tables 30″ high x 48″ wide x 18″ deep and “Asian” in style. An overhanging top and reverse taper legs could evoke a torii gate. I also like the stepped arch Darrell Peart uses in some of his work and wanted to incorporate it. The arch adds a little visual variety and echoes the curves of the legs.